Google Tag Manager: Part 4 – Filtering Internal Traffic
The first three parts of this discussion on Google Tag Manger focussed on the general idea behind Tag Manager, the initial setup, and using events. This post is going to discuss how to set up a common task for Analytics – filtering out internal traffic.
Although there are a few ways of achieving this goal, I’ve always been a fan of using a non-public page to set a custom variable, then using Google Analytics to filter out any visitors that have this variable set. I’ve done this by creating a special page and putting a shortcut in the browser of the business computers to go to this special website, set the variable, then direct the user to the public website. In Google Analytics, I’ve set up a view on the Analytics property, filtering out all of the users that have this variable set.
It’s not hard to find implementations of this on-line. However, all of the on-line examples I’ve found make use of the setVar function, which has been deprecated. Although this function still works, I prefer to keep up to date with the recommended usage whenever possible.
When setVar was replaced by setCustomVar, there was a major weakness – it was not possible to build a filter on these custom variables. So it was infeasible to make changes to take advantage of the new custom variables.
But now, with the introduction of Universal Analytics, there is a new option: custom dimension. This option lets me keep the basic strategy from before, where a user-level variable can be set and a profile view created that filters out internal users.
The instructions below use Google Tag Manger to set up this system, although it can also be done directly with Google Universal Analytics. To do this, simply change Step 2, and instead of using the Tag Manger code, replace it with your Universal Analytics code, adding in the code to set the custom dimension variable.
Step 1 – Create A Custom Dimension
First step is to create the custom dimension in Universal Analytics. From the Admin section, select the property, and if you’ve updated to Universal Analytics, you’ll now see a new option called Custom Dimensions. Click on this and create a new dimension, with the name “Internal Traffic”, scope set to “User” and make sure it is active.
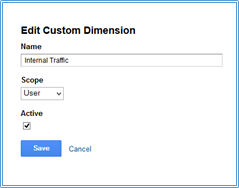
Once you save the new custom dimension, make a note of the dimension number. If this is your first custom dimension, it will have the number 1, as shown below.

Step 2 – Create A Special Page
The second step is to create a special page that will only be accessed by your internal users. This is a very simple page with only two components, as shown below. There is a Meta Refresh statement that redirects the user to the actual home page after one second, and a second part which is simply your Google Tag Manger code. In the example below, I’ve added a short line to the screen simply to let the user know what is happening, and named the page “InternalTracking.html”.
<head><meta http-equiv="REFRESH" content="1;url=http://www.yoursite.ca"></head><body><!-- Google Tag Manager --><noscript><iframe src="//www.googletagmanager.com/ns.html?id=GTM-XXXXXX"height="0" width="0" style="display:none;visibility:hidden"></iframe></noscript><script>(function(w,d,s,l,i){w[l]=w[l]||[];w[l].push({'gtm.start':new Date().getTime(),event:'gtm.js'});var f=d.getElementsByTagName(s)[0],j=d.createElement(s),dl=l!='dataLayer'?'&l='+l:'';j.async=true;j.src='//www.googletagmanager.com/gtm.js?id='+i+dl;f.parentNode.insertBefore(j,f);})(window,document,'script','dataLayer','GTM-XXXXXX');</script><!-- End Google Tag Manager -->Internal Tracking is now set for Universal Analytics</body>
Step 3 – Set The Variable In Google Tag Manager
The final step is to create the tag that will set the custom dimension for the user. Go to Google Tag Manger for this site, and choose New -> Tag. Name the tag “Set Internal Tracking” (or a similar name), set the tag type to “Universal Analytics”, set your Analytics Tracking ID, and select “Page View” for the track type. Under More Settings -> Custom Dimensions, set the index to 1 (or whatever the custom dimension number was from Step 1), and give the variable a value, such as “Internal”.
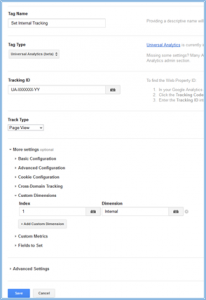
Before saving the new tag, a rule has to be set so that this tag is only fired on the private page. Add a new rule, name it “Internal Tracking Page”, and create the rule “{{url}} equals http://www.yoursite.com/InternalTracking.html”.
Finally, test the new tag, create a new version and publish. The new tag will now set the user-level custom dimension for all your internal users, and Google Universal Analytics will filter out any users that have set this variable.
Also, if for some reason you want to keep track of your internal users, it is a relatively easy exercise to create a page for each person, and set the value of the custom dimension differently for each user. You can then create custom reports in your unfiltered Google Analytics data to see the usage for each of your users.